Do you know the difference between clean and dirty leather? We wouldn't be surprised if you don't because there are many misconceptions as to what is right or wrong when it comes to caring for your leather seats properly. In this article we will be discussing the difference between clean and dirty leather, how to determine if your leather is clean or dirty, and tips for cleaning your leather if you find that it is dirty!
What does clean and dirty leather look like?
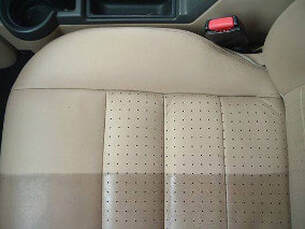
Dirty leather vs Clean Leather
As you can see in the photo above, clean leather looks very different from dirty leather.
Over years of constant use and abuse leather will accumulate with dirt, dyes, and other grime. On the bottom of the photo pictured above you are seeing a filthy leather seat and the top half has been cleaned and restored. The difference is clearly noticeable and dramatic.
If your vehicle has real leather seats and not a synthetic type material then you can think of your seat like skin on your body. It has pores! And just like our skin needs regularly cleaned, so does your leather to prevent it from losing its natural appearance. Even if you have a synthetic type leather seat it does not need as rigorous of cleaning and care as real leather but the same principles do apply.
One more big tell tale sign that your leather is dirty is if it has a shiny appearance. The shiny surface you are looking at is actually oils, grime, grease, and dyes that have transferred over to the seat leaving you with a shiny seat. From the factory any leather and leather substitute have a nice subtle matte finish to them. This is what they should look like.
So do you have dirty leather? If so, continue below to find out how to clean them properly.
Cleaning dirty leather
SO from what you learned above you've now determined that your leather is dirty! So how should you go about cleaning it? Well, let's find out.
Step 1 : Vacuum any loose dirt
The point of this step is to remove any large dirt, grime, or crumbs that may still be on your seat. We don't want to grind anything such as this into the leather even further which could possibly scratch or damage the surface.
Step 2 : Clean the seat
For this step all you will need is a good all purpose cleaner (APC) and a couple assorted brushes as well as a couple good microfiber towels.
Start by diluting your choice of APC to the recommended dilution. Now we're going to work on one seat at a time. Spray the APC onto the entire seat and let sit for a few minutes.
After it has had a chance to sit and dwell we will now agitate the seat to remove the stubborn grime inbedded in the seat. By using a medium stiffness bristle brush we can easily perform this task. To speed things up consider using a drill brush attachment. Using the brush of your choosing go ahead and agitate the entire seat with APC on it. If you'd like you can do the seat bottom then seat back or just do the entire seat at once.
After you have agitated the seat it's time to wipe away that grime to reveal a nice clean surface!
Step 3 : Admire your results
If you performed all the steps above you should now be left with a subtle matte finish looking seat that is all clean. If you are still seeing dirt in the texture of your seat that wasn't removed just repeat step 2 until your desired level of clean is achieved!
Now sit back in style
Now that your leather seats are nice and clean feel free to take a second to sit back in style to admire your work! You can rest easy knowing they will be looking good for months to come. And you want to know the best part? Now when you notice your seats or anyone else's leather seats looking a bit under the weather you can confidently say you know how to take care of the issue!
We hope this article helps in your journey to keep your ride clean! And as always if you have any questions that we may not have covered here today please don't hesitate to reach out to us directly at 814-230-6991! Or email us at inquires@keystonedetailpa.com